Showing posts with label design. Show all posts

Tuesday, November 23, 2010

Table Numbers?

So I struggled and struggled over table numbers. Originally we wanted to do photos of us at each age. Finding cute pictures for each age; however, proved problematic. I couldn't find any photos of me at age 2 and Wayne was apparently non-existent from ages 5-8. Alas.

Ultimately we decided to do table names instead, naming each table after our favorite places. We then added pictures of us at that place and voila! cute table names. Luckily we only have 7 tables. It would be difficult to use names if you have a really large wedding because folks might get frustrated trying to locate their table in a huge sea of options.

I have most of our photos uploaded to Walgreens.com, so I went on their website to review pictures and get ideas for place names. While there, I stumbled on their photo holiday cards and took my inspiration from them. I used a little digital scrapbooking magic and added our photos and I'm very pleased with the results!

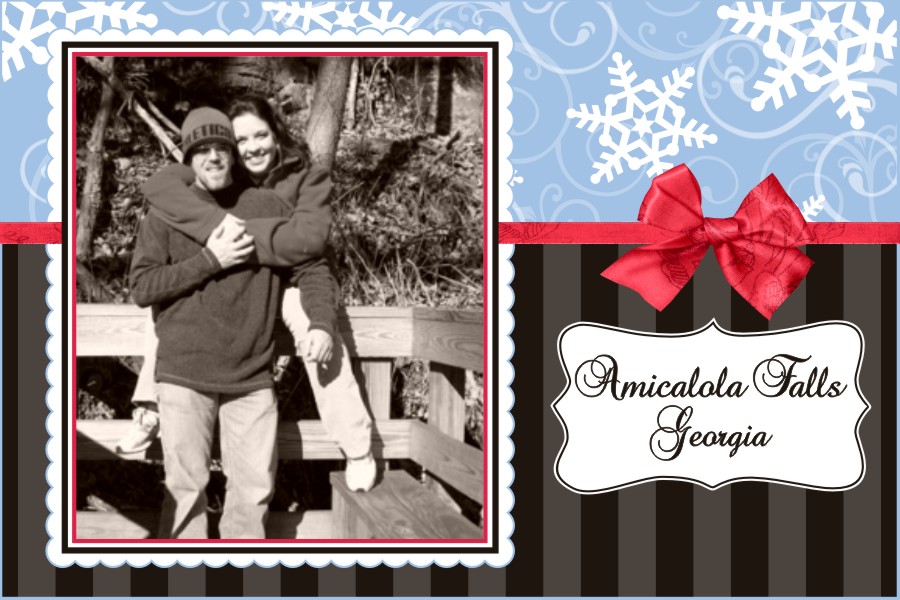
Not traditional? So what else is new? It's a little fun and different and I'd like to think that describes us a couple, too. Perfect! If anyone reading this happens to be coming to the wedding, can you guess what table you'll be visiting?

Tuesday, October 26, 2010

Label love

I know... I get it... Address labels are supposed to be handwritten. It's in all the etiquette books. It's everywhere online. It shows that I'm a good hostess, right? And that I pay special attention to the details. It's warm and personal. But? No buts, that's the end of it. But, wouldn't it look charming and lovely to use a delightful font and print it on clear labels that basically disappear, giving the illusion of hand calligraphy? Nope. No dice. Old school here.

I can't; however, rationalize shelling out oodles of money for a professional calligrapher and I haven't used a calligraphy pen since middle school. My handwriting is so-so, but I wanted something a little more special than just an address on a lovely white pearly envelope. Enter Martha Stewart, goddess of all "good things" and weddings. I found her version of address labels here. And although she says that it's an appropriate option, I was still yearning for old school handwriting.

So I modified her idea so that the address block allowed space for my own handwriting. I found a high quality black pen and got to work. The other advantage was that I could print the labels on my ink jet. If I messed up, it was a simple matter of printing a few extras. A MUCH more cost effective solution than purchasing extra, expensive white pearly envelopes.

The labels wrap around and have the return address printed in the same font that I used on the Save the Dates and the actual invitations. A nice compromise, right? Oh, and how cute are my personalized Zazzle stamps?

Friday, October 22, 2010

You're Invited!

Please note that if you would like to be surprised my the arrival of my invites- STOP READING NOW!


SERIOUSLY, STOP READING IF YOU WANT TO BE SURPRISED. I MEAN IT.


ARE YOU SURE? IF YOU'RE STILL READING THIS IT MUST MEAN THAT YOU WANT A SNEAK PEEK AT THE INVITES.


SO HERE THEY ARE. WITHOUT FURTHER ADO...


WELL MAYBE A LITTLE ADO...


My invites! Ta Da!


After many slight (and not so slight) snafus. Snafu #67: Exploding glue all over the living room. But they're done. They're lovely. And they're on their way!

Tuesday, September 28, 2010

Extra! Extra!

Read all about it! I love a reason to make a newsletter, and what's more news-worthy than a wedding! To keep guests informed, even before the invitations go out, I created a wedding newsletter. It contains a little behind-the-scenes information about the wedding, travel arrangements, accommodations, and information about the area. I also included a little section on weather and what to wear, which seems to always be in question for wedding guests.

I also directed guests to our wedding website and this blog. Is it weird to write a blog post about a newsletter that talks about a blog post? Oh well, circular logic aside, Enjoy!

Wednesday, August 18, 2010

Can I Offer You a Drink?

Of water, of course! What OOT bag would be complete without a couple bottles of water? But plain ol' bottled water without custom labels? Not on my watch! I knew that I wanted to add cute custom labels to my bottles, and debated doing them myself. After some thought, however, I decided that I need to bring in professional reinforcements on this one. Our hotel has fridges in each room, so I figure that folks might toss their bottles in there. Once the condensation starts, I knew that my little inkjet labels would melt, slide, and run into a drippy mess.

I looked at several sites that print custom labels and most of them had some pretty decent pre-designed templates. Because I have such a specific design concept, however, I really wanted to find a company that would print completely custom designs. I decided to use a company called Bottle Your Brand.

I opted to have the company apply my labels to the bottles and send the whole shebang at once. In hindsight, I should have just ordered the labels, because my order (bottles + labels) was approximately $30 before shipping. Just ordering the labels would have been under $10. With added weight of the water bottles, shipping was also more expensive, so note to self: Duh, just order the labels and spend the 20 minutes adhering them yourself, ding dong.

But, I will say, I'm very happy with the results. The labels turned out great and the cute little 8 oz. bottles will fit perfectly in our gable boxes.

I loved being able to create custom designs that corresponded perfectly with my other DIY projects... all the way down to the right font and cute little red lovebirds.

Monday, August 16, 2010

Dessert Buffet Favor Bags... Almost Done!

In my previous post, I lamented the ink depletion that brought the DIY factory to a halt this week end. Case in point? My dessert buffet favor bags. I set my printer to complete 5 pages of these little babies and then left it alone and went back into the living room to get started on another project. After all, printing high-quality on photo paper takes a long time on an ink jet printer.

After about 20 minutes, I went back to check on them... only to find 1 usable page out of 5. I had completely emptied the yellow ink cartridge and the last 4 pages were a strange dark violet color instead of brown. After a moment of brow-furrowing frustration, I tossed the unusable pages in the recycling bin and got to work on the 12 I was actually going to be able to finish.

We had already selected half-pint tin tie bags for use with the dessert buffet. I am planning on enough candy/cookies to look cool, which will be waaayyy more than the 50 of us can eat in 4 hours! I plan to have the bags as favors that folks can take with them for the road.

To decorate them, I created round labels that coordinated with the rest of my DIY projects. I printed them on photo paper to give them a glossy, professional finish.


Then I used my 2.5" paper punch from EK Success to punch out each of the labels.


I used a 3.0" scalloped circle paper punch to punch scalloped circles out of red card stock.


I adhered the round labels to the scalloped circle and then adhered the scalloped circle to the tin tie bags.


Although red card stock that I ordered is a little darker than I would have liked, I don't think anyone but me is going to notice. I'm very happy with how they turned out and I think the bags will look cute on the dessert buffet table. So, although the project is not quite done, I'm tentatively checking this one off the list!

Lip Balm Lovelies

I was a DIY machine this past week end. I doggedly plowed through project after project... until my printer ran out of ink! Ugh. With no motivation to voluntarily go out in the 95-degree heat in my un-air conditioned car, I came to a stand still.

Before said ink depletion, I finished by lip balm labels. I love only having to do 15 OOT bags, it makes doing things by hand actually feasible and not an act of mind-numbing tedium.

To make the labels, I used a string wrapped around a lip balm tube to find the circumference. Combined with the height of the lip balm label, I had my lip balm size: 2.125" X 1.675". I printed 12 on each sheet. I used laser brochure paper, which is slightly glossy and a little heavier than regular paper.

I had tried to use photo paper, which is even heavier, but the photo paper had NO interested in being cylindrical and no amount of adhesive could convince it!

I just cut out each label by hand and used a Tombo adhesive runner to adhere the labels to each tube. All in all, it only took about 1/2 hour to print, trim, and adhere all 15 labels.

Plus, these were a budget bonanza because I got the lip balms from a colleague that was giving them away as promotional items! AND, they're even tropical flavored (which I think is some sort of pineapple - coconut combo), which is perfect for a Florida OOT bag!

One more project done!

Sunday, August 15, 2010

Mmmm... Cocoa

Remember the snowflake marshmallows discussed earlier? And the cocoa packaging I highlighted in an earlier post? Well, I finally finished that little project, and it went something like this:

Step 1: I printed all the labels on glossy photo paper and trimmed them to size. I busted out my trusty Xyron machine, and ran all the labels through to make them adhesive. Thank goodness for this wonderful machine, which has saved me oodles of time using glue sticks or tape runners.


Step 2: I adhered ribbon around the pillow box, making sure the ends met on the front of the box so that they will be hidden by the label.


Step 3: I adhered the label to the front of the box, hiding the ribbon ends.


That's it... a completed set of personalized cocoa packets, ready for packing into the OOT bags!

My Favorite DIY Project So Far (OOT booklets)

Also known as my OOT bag booklets. These are a labor of love, for sure. I say "are" instead of "were" because I've only finished one. They are 8 pages, front and back, and time consuming... to say the least. But boy am I pleased with how it turned out!

I printed the pages on white card stock and trimmed each page to 5.25" X 7.25." Then I mounted each page (front and back) on dark brown card stock, trimmed to 5.5" X 8.5." I cut a small piece of red card stock to wrap around the front and back of the booklet. Using a small finishing nail, I pierced 2 holes through all the pages. I used silver brads to hold the whole thing together.

Due to the thickness of the completed booklet, I wanted to add a ribbon tie to keep the booklet closed. To secure the ribbon, I attached it to both covers, between the card stock and printed pages.

The entire booklet consisted of the following pages:
Welcome Postcard Photo
Welcome Message from Bride and Groom
Description of Contents
Schedule of Events
Directions
Local Map
Things To Do
Places To Eat
Photo-sharing Information
Explanation of Local Landmarks
Crossword Puzzle
Word Search
Maze
Sudoku (2 Puzzles)

Here are some highlights:

Scanned image of a Weeki Wachee mermaid postcard

Welcome letter from us

Schedule of events

One of the Sudoku puzzles


Although it will take me a big chunk of time to finish 15 of these lovelies, I think our guests will really appreciate the personal touch. And if our guests don't notice, then at least it was a fun project to work on!

Monday, August 2, 2010

DIY Tears of Joy

I have a fascination with Tears of Joy tissues:

So I've decided to make my own. The first step is to order glassine bags. They are the type of bags that stamp collectors keep valuable stamps in. I'm going a different direction- I'm opting instead to keep valuable Kleenex in mine.

They are relatively inexpensive and can be ordered from paper and philately supply stores (like how I worked in a S.A.T word?). I purchased my glassine envelopes from the NOLA Stamp Shop on eBay. The #3 size, which measures 4¼” x 2½”, is perfect for 2 tissues. If you purchase the travel-sized packs of tissues, they are already perfectly folded!

While Wayne was packaging up cocoa, I got to work on the tissue packets:

I ran out of tissues before I could get them all finished, but I'm well on my way to completing this DIY project.

A lot of folks have ordered custom labels from online label vendors, but that gets expensive when you factor in shipping. Instead, I purchased a rectangle paper punch and designed my own labels (which I clearly love to do):

Once I finish stuffing the remaining glassine envelopes, I'll do a ribbon wrap and affix the label on each packet. I intend to include them with the program on each chair.

Sunday, August 1, 2010

Packing Cocoa

As I mentioned earlier, we purchased a variety of cocoa packets for inclusion in our OOT bags. Since I'm really into creating custom packaging (if you don't believe me, read this post, this post, or this post), I decided to create cute little pillow packs for the cocoa. I ordered pillow boxes from Nashville Wraps, and when they arrived I enlisted some help to get started.

These cute little boxes are the perfect size for 2 gourmet cocoa packets from Land O'Lakes.

I created cute custom labels:

that I will print on glossy paper, trim to size and affix to the pillow box with a ribbon wrap. So ridiculously cute!

Saturday, July 31, 2010

Dessert Buffet Labels

I finally decided that it was time to get the design shop in high gear. And by that, I mean it's time for me to get a move on (or "hubba, hubba" as my grandma would say) and get some DIY projects done now before the time crunch hits later this fall.

--Save the dates: Check (see them here)

--Dessert buffet plan: Check (see it here)

--Labels for dessert favor bags: Check (see them here)

I tried to tie in some graphic elements from our stationery, such as the flourishes and the fonts, but I gave them a little fun personality with the little swirly-doo at the top:

I think it looks like a vintage candy shoppe label, and coordinates with the other elements of the wedding.

I'm planning to hang them on the lids like the cute labels from this gorgeous Amy Atlas design:


Aside from actually baking the cookies and cupcakes (which can't happen until the week of the wedding), I think the dessert buffet is good to go. Oh, except for the fact that I haven't ordered ANY of the candy yet. I am planning to wait until fall so that I won't have to pay for expedited shipping or cold packs. I do; however, have a list of items and online retailers to make the process a little faster!

Tuesday, July 27, 2010

Candy Favor Labels

Check another thing off my list-- now I've completed the label for the favor bags that will accompany our dessert buffet. I've decided on plain white tin-tie bags that I got from Nashville Wraps for $16.95 (for 100):

I wanted to create labels that matched our stationery design motif, but was a little different to have its own personality.

This is what I came up with:

That makes 3 completed projects (well, completed when my new paper punches arrive and I actually print them out).

--Save the dates: Check (see them here)

--Dessert buffet plan: Check (see it here)

Whew the design shop is in full swing today!

Thursday, July 1, 2010

Cookie Condoms

Since this is my personal blog, I can call this post whatever I want. So "Cookie Condoms" it is. You'll see why I developed this inappropriate moniker in a bit.

When I began work on our OOT bags, I admit, it was with much gusto (My obsession has been chronicled here and here). I've been laboring over contents, design, distribution, etc. I've begun the process of collecting items, which has involved a great deal of internet research to find cost-efficient options. I found these adorable boxes of cookies:

at The English Tea Store. They had both key lime and coconut, which are such great choices for our OOT bags.

While the boxes are very cute, they don't match our colors. Now, admittedly, I have a problem. I'm a classic over-thinker (to borrow a line from The Office), so I decided to create a label to dress up the cookies. I didn't want to wrap the whole box like a present, because I thought it would be bulky and a bit amateurish. Ultimately, I decided to make a wrap out of kraft card stock.

So I pulled out my paper trimmer, bone folder, and scoring blade and went to work. Here are the wraps and cookie boxes, before they met:

Now sliding the wraps around the boxes was a bit trickier than I had imagined. I measured very carefully so that they would fit snugly, and boy did they ever (Hence my name for this post). I persevered; however, and triumphed over cardboard. I know I have a problem. Not everything has to have our logo and/or motif. But I can't help it; they are just so darn cute.

I created labels and printed them glossy photo paper, wrapped each box with brown ribbon, and affixed the label to the front:


Here they are, a box full of label addiction:

Next, I'm working on hot cocoa packets, lip balm, and sunscreen. Stay tuned as I continue to be my own worst enabler...

Friday, February 12, 2010

STD Out-takes

OK, so we decided on a cute picture for our Save the Dates, but believe me when I tell you that there were some really funny ones that ended up on the cutting room floor (metaphorically speaking, of course). I couldn't just let them sit, unappreciated on my hard drive, so here are some of the funny (silly or weird) ones:

Not only do I look like I have 4 chins, but I really love the hose and recycling bins behind us. Oh, and of course there is the fact that you can't actually see the "Save the Date" sign!

Why am I pointing at the sign? Did I really think that anyone would fail to see the chalkboard placed in front of our faces?

Oh Crap! Do you think they can see us behind this 12" x 12" chalkboard?

This one is just funny because it looks like we're playing tug-o-war with the chalkboard.

Well that's enough embarrassing photos for one day! Thanks for stopping by.