Tuesday, October 26, 2010

Label love

I know... I get it... Address labels are supposed to be handwritten. It's in all the etiquette books. It's everywhere online. It shows that I'm a good hostess, right? And that I pay special attention to the details. It's warm and personal. But? No buts, that's the end of it. But, wouldn't it look charming and lovely to use a delightful font and print it on clear labels that basically disappear, giving the illusion of hand calligraphy? Nope. No dice. Old school here.

I can't; however, rationalize shelling out oodles of money for a professional calligrapher and I haven't used a calligraphy pen since middle school. My handwriting is so-so, but I wanted something a little more special than just an address on a lovely white pearly envelope. Enter Martha Stewart, goddess of all "good things" and weddings. I found her version of address labels here. And although she says that it's an appropriate option, I was still yearning for old school handwriting.

So I modified her idea so that the address block allowed space for my own handwriting. I found a high quality black pen and got to work. The other advantage was that I could print the labels on my ink jet. If I messed up, it was a simple matter of printing a few extras. A MUCH more cost effective solution than purchasing extra, expensive white pearly envelopes.

The labels wrap around and have the return address printed in the same font that I used on the Save the Dates and the actual invitations. A nice compromise, right? Oh, and how cute are my personalized Zazzle stamps?

Friday, October 22, 2010

You're Invited!

Please note that if you would like to be surprised my the arrival of my invites- STOP READING NOW!


SERIOUSLY, STOP READING IF YOU WANT TO BE SURPRISED. I MEAN IT.


ARE YOU SURE? IF YOU'RE STILL READING THIS IT MUST MEAN THAT YOU WANT A SNEAK PEEK AT THE INVITES.


SO HERE THEY ARE. WITHOUT FURTHER ADO...


WELL MAYBE A LITTLE ADO...


My invites! Ta Da!


After many slight (and not so slight) snafus. Snafu #67: Exploding glue all over the living room. But they're done. They're lovely. And they're on their way!

Monday, October 18, 2010

Oh, the Cuteness (a.k.a. "A Story of Escort Cards")

In earlier posts, I lamented my inability to make a decision about escort cards. I knew I wanted them, in fact felt strongly that I needed to have them. I even found a lot of designs that I liked. Maybe even a few that I loved. But I couldn't land on a final design. I got momentarily inspired and excited by a new-found design, only to quickly lose steam once it came time to actually design them.

And then, while searching wedding favor stores for completely unrelated items, I found my solution. The skies parted, sun shone through and a choir of angels heralded the arrival of a perfect solution! OK, admittedly, that's a smidge dramatic, but I think I made my point. It was a solution so lovely, so perfect, so "me" that I ordered them immediately. I can now introduce you to my escort cards:

While I fully intend to redesign the basic card, the idea of the plantable paper snowflake and the use of a gardening pun simply warmed my heart. Who doesn't love a well-placed pun? It may not be the most creative solution, or even the most elegant, but it's very much in tune with my "green" sensibilities and adds a charming touch of spring to our winter festivities!

Monday, October 11, 2010

DIY Boutonnières

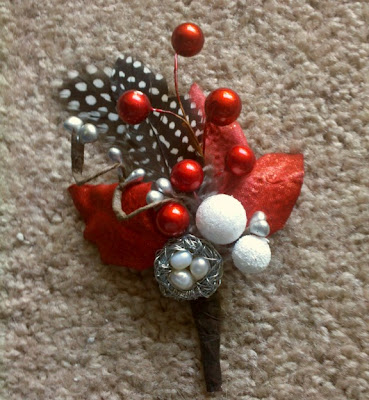
If you've read my earlier post, you already know my desire to try my hand at DIY boutonnieres. Admittedly, I started slow. I wasn't sure where to begin the structure of the mini floral arrangement. I could have searched for one of the thousands of articles online, but my computer was in the other room, and I was feeling stubborn. It's just silk flowers and floral wire, for crying out loud!

After a little trial and error, I actually put together a boutonnière that I'm sort of in love with! It has the right blend of earth tones and reds, and even has a little sparkle. I even used some of the same floral elements that Mom and I used in the centerpieces and pomanders. I must say, if I can toot my own horn a little bit, I'm very pleased with the results.

Although it took me MUCH longer than expected (Don't all DIY projects seem to do that?), It actually saved me a good bit of money. Had I ordered them from one of my favorite vendors on Etsy, it probably would have cost me about $75, which is quite reasonable, don't get me wrong. With all my supplies, I think all six will cost me about $30. Plus, I have the satisfaction of having done them myself and I'm proud of that!

I definitely won't be quitting my day job, largely because I'd have to charge about $60 per boutonnière to account for my time! Would you consider DIY boutonnières?

Wednesday, October 6, 2010

Dinner Decor

Well, I have pretty much spent over 40 blog posts talking about the wedding. Guess what, there is an event that happens even earlier on the calendar that I don't want to neglect... the rehearsal dinner!

Wayne and I are largely handling the dinner ourselves. We've booked the room in the restaurant of our choice (Bare Bones on Hernando Beach), and I'll be handling the rehearsal dinner decor. I wanted to stay with the same color scheme as the wedding, and keep the snowflake, cardinal, and branch motif. For the dinner; however, I wanted to go a little more rustic. More of a log cabin feel. The wedding is all about bling; I wanted the rehearsal dinner to be a little more casual.

I got my main inspiration from this lovely design by another bride blogger:

I love the pine cones, bird nests, and candles. Of course, the colors are all wrong, but that's easily remedied. Instead of copper, our metal of choice is silver, so that can be changed, too. I was so excited to find these wonderful candles from an Etsy vendor (Twigs and Blossoms):

They were a bit pricey; however, and it was a bit outside my budget to purchase enough for all the tables at the dinner. Then I found these:

Plain birch candles... AND they were very affordable. The plain ones (purchased from another Etsy vendor) cost me less than $25 for 8! Much more affordable than the first version. To add to my enthusiasm, I remembered that we have a wood-burning set at work. How hard can it be to draw some snowflakes?

As it turns out, it's not that hard. A bit time-consuming to be sure, but not hard at all. I'm actually quite thrilled with the results. I also plan to collect some pine cones, perhaps add a little sparkle to them, and some silver candles to complete the tablescape, but you'll have to stay tuned for more details about that!

Friday, October 1, 2010

DIY Guestbook

So, in an earlier post, I described our wish tree, which will be a lovely addition to our gift table. At the time, I hinted (OK, outright told you about) a DIY guestbook that would allow for a little more creativity for our guests.

There is a wonderful online vendor called the Guestbook Store, which offers great alternatives to traditional guestbooks. While I love their designs, I didn't love the prices... plus, I wanted to use our names instead of the generic "bride and groom." So, I thought to myself, "hey, I can do that," which is almost always what I think to myself when I conjure up new diy projects. I'm about 60% right when I say that to myself. This time; however, I was indeed right. I CAN do that.

So I took inspiration from designs from the Guestbook Store, and got a little more inspiration from clever brides on Weddingbee, and voila! DIY Guestbook pages! I customized them with fun questions about us, and the ubiquitous bird, branch, and snowflake designs and I'm so happy with the results.

Front:
Back:
I plan to place pages on each table at the reception with a note, encouraging guests to fill them out. At the end of the reception, I plan to have members of the wedding party gather up the completed pages for safe-keeping.

I sized them to be 8" X 8" so that they will fit perfectly in scrapbook page protectors. I think it will be a fun addition to the collection of photo albums and scrapbooks about our wedding!